Customers/Suppliers
The Retica Customers/Suppliers section is designed to manage documents for each customer or supplier separately. For each of them, you can automate different features to improve and speed up the processing and export of documents to your business software.
Let’s see how it works.
Create your own customer/supplier list
Retica allows you to create your customers or suppliers through three different methods: manually, via CSV, XLSX or XLS files, or through automatic synchronization with your management system.
To manually insert a customer, you need to press the gear-shaped button and select “Add”.

Next, select “Add manually” from the window that appears and enter the necessary data to create a customer or supplier. Mandatory information is: Company Name and Type (customer or supplier). Optional information includes VAT number, Address and Unique ID (customer/supplier code in the company management system).
If you want to import one or more customers/suppliers in bulk, you can do so via an XLS, XLSX or CSV file. To proceed, follow the steps explained above, but instead of pressing the “Add manually” button, select “Import via CSV file”.
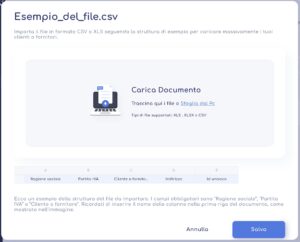
Once pressed, a window will appear where you can import the file by dragging it into the gray area. The file must contain nine columns: Company Name, VAT Number, Customer or Supplier, Address, Code, Sost.Customer/Supplier, Sost.YourInformation, Conditions and Available Models.
Make sure to keep the column headers in the first row of the file. For importing via file, the necessary information is: Company Name, VAT Number, and Customer or Supplier. The VAT Number must be unique, as well as the Management Code (Code). In the “Customer or Supplier” column, write “customer” or “supplier”.
In the “Sost.Cliente/Fornitore” and “Sost.LeTueInformazioni” columns, enter TRUE if you want the customer/supplier information and the company information of the account owner to be taken from the customers/suppliers section and not from the document when processing a document. This is useful for standardizing the information to be imported into a business software. You can also activate this function in just one of the two columns, by entering FALSE in the column you do not want to activate.
In the “Condizioni” column, you can enter the name of the list of conditions that you want to associate with the customer, making them automatically active for each document processing done for the chosen customer.
Finally, we have the “Available Models” column that allows you to enable only some models for this customer. This is designed to simplify the daily use of Retica by multiple operators, avoiding leaving too many options to users. If you want to activate this feature, enter the names of the models separated by a comma in the column (for example: Purchase Orders, Invoices, Custom Model 1, Custom Model 2).
These features just described are shown in more detail below in the “Customer/Supplier Settings” section.
Once you have entered all the information, press the “Save” button to massively upload your master data.

If you want to automatically synchronize customers or suppliers with your business software, follow these steps:
- Open Settings:
- Press the wheel button to open the settings.
- Select “Sync. Automatic”.
- Connection Configuration:
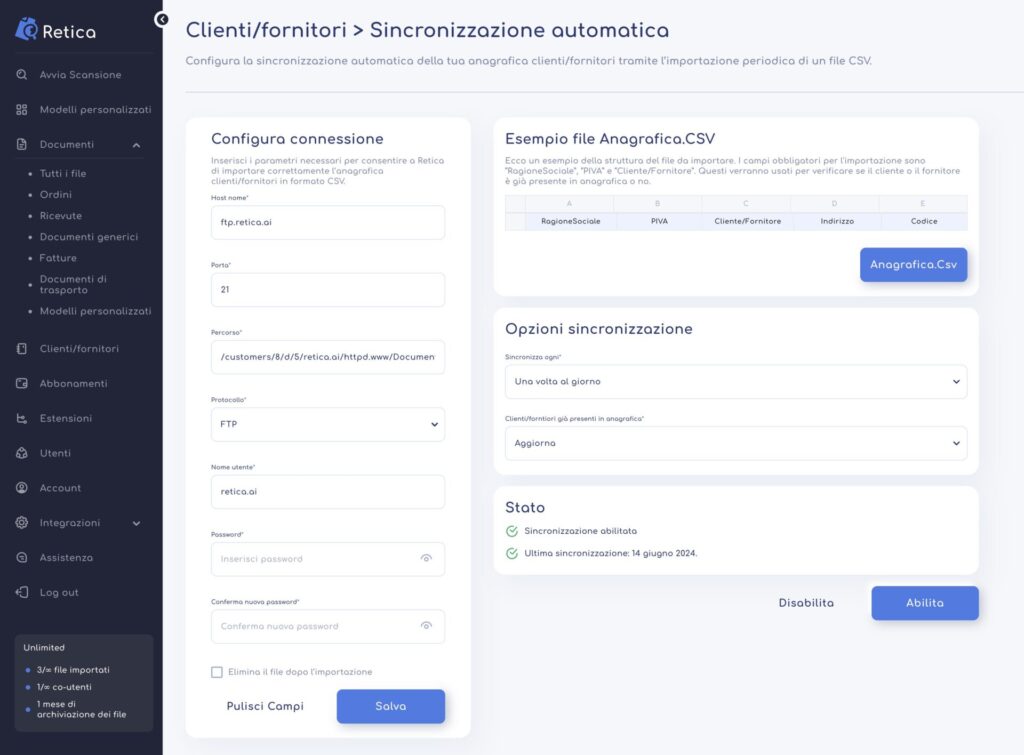
- On the page that opens, locate the “Configure connection” block.
- This block allows you to configure the FTP, FTPS or SFTP connection with your server.
- Enter all the required parameters and press the “Save” button.
- If the connection is established correctly, a green badge will appear to confirm the successful connection.
- If there are problems, a red warning will appear to indicate the error encountered.
- Once successfully established, the configuration is automatically saved.
- CSV File Structure:
- The “Example anagraphics” block shows the correct structure that the CSV file must have to be read correctly.
- Using the “Anagraphics.csv” button you can download an example of the CSV file to use.
- Make sure that the CSV file created and stored in the FTP folder has the name “Anagrafica.csv” and that it contains the mandatory fields for each customer/supplier: “Company Name”, “PIVA” and “Customer/Supplier”.
- Configuration Options:
- Go to the “Configuration Options” block.
- Here you can select the synchronization period and decide whether to update or ignore the customers/suppliers already present in the registry with the information from the “Anagrafica.csv” file.
- Synchronization Activation:
- Press the “Enable” button to activate the synchronization.
- Status Monitoring:
- In the “Status” block you can see if the synchronization is active and working, view the last synchronization and, in case of errors, the problem that is blocking the synchronization will be shown.
Important Note:
The synchronization does not occur in real time, but at the beginning of the following day. To monitor the synchronization status, keep an eye on the “Status” block.

List of customers and suppliers
Once you have added the selected customers or suppliers, they will be visible in the main table of the section, along with their associated data:

By pressing the options button at the end of a customer or supplier line, you can perform the following actions:
- Edit: Edit the customer/supplier information through a dedicated window.
- Documents: Import documents related to this customer/supplier using the automations set.
- Settings: Set up automations for this customer/supplier to be executed during document processing.
- Remove: Permanently delete the customer/supplier.
Customer/Supplier Settings
In this section you can create automations to be executed automatically when processing documents for a customer/supplier.
The section is divided into four sub-sections, which can be navigated using the buttons at the top of the page:
- Personal Data
- Conditions
- Documents
- Items
Personal Data
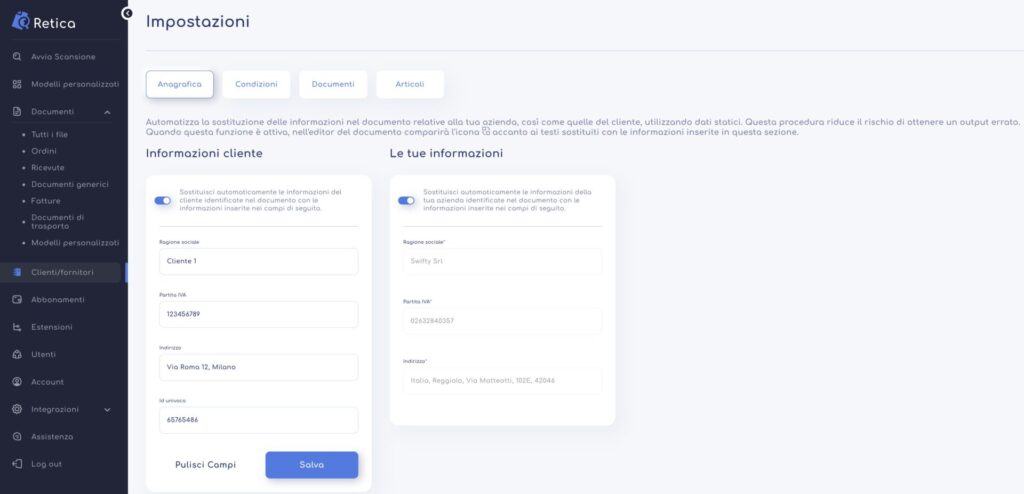
In the “Personal Data” sub-section you can enter the personal data of a customer/supplier in the “Customer or Supplier Information” block. Once the information has been entered and the switch enabled, Retica will use this data by default when processing documents. Values such as Company Name, Address, VAT Number and Customer/Supplier Code will no longer be taken from the document, but those entered in this block will be used. When this function is active, an icon will appear next to the label, indicating that the value is taken from the personal data section and not from the document.
You can also apply the same automation for your company data. By filling in the “Your information” block and enabling the switch, Retica will replace your company information with the information identified in the document.
This feature is designed to avoid having missing or incorrect information in the output file.

Conditions
The “Conditions” subsection allows you to automatically apply a list of conditions to documents processed for the customer/supplier. To enable this feature, follow these steps:
- Selecting the Condition List:
- Select the desired list of conditions from the drop-down menu.
- Saving Conditions:
- Press the “Save” button to apply the selected conditions.
The condition lists displayed in the drop-down menu are taken from the “Conditions” extension. Be sure to activate it and create your own custom lists (see “Conditions” article).
Once enabled, the condition list will be automatically applied to every new document processed for the chosen customer/supplier, eliminating the need to do it manually each time.

Documents
In this section, you can configure the document processing templates available for customers and suppliers. This feature is designed to prevent the use of incorrect reading templates for a customer’s documents, and ensures that only the appropriate templates are used to process customer documents.
Adding a Reading Template
To add a reading template to a customer, follow these steps:
- Press the “Add” button.
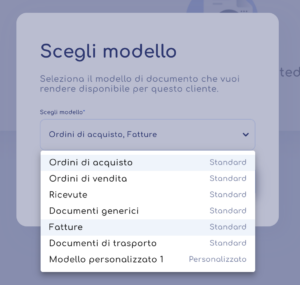
- Select the desired templates from the drop-down menu. Both standard and custom templates are available.
- You can select more than one template for each customer.

Once selected and added, the templates will be displayed in the table of reading templates available for the customer.
This means that when importing documents for the customer, you will only be able to select the templates listed in this table.

Items
This section displays the items associated with the customer. Using the “List of Items” extension, you can upload one or more items and associate them with customers or suppliers via VAT number (PIVA) or unique ID. The items shown in this table are exclusively those related to the selected customer or supplier.
If the autocomplete feature is activated in the “List of Items” extension, the software will automatically apply the corresponding item code in the output file for uploaded documents that contain an item description present in this list.


